QOS Module
This section provides details on managing Quality of Service (QOS) settings in the Cloud HPC platform.
QOS policies define scheduling limits, priorities, and resource controls for users, groups, and clusters.
QOS List Screen
Overview
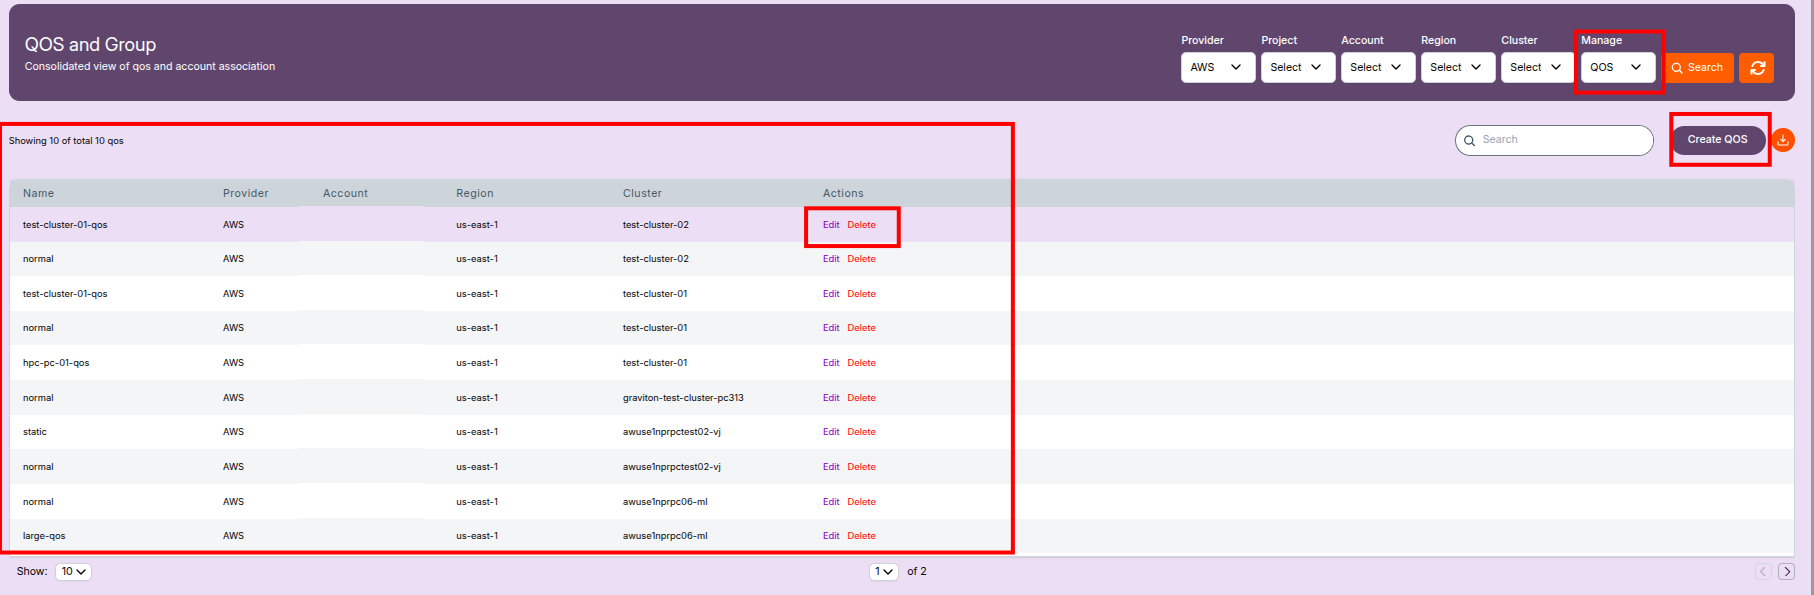
Displays all configured QOS entries in the system.
Columns Displayed
- Name – QOS policy name (e.g.,
normal,test-cluster-01-qos,large-qos). - Provider – Cloud platform (usually AWS).
- Account – AWS account ID.
- Region – Cloud region.
- Cluster – Cluster associated with the QOS.
- Actions
- Edit – Opens the QOS edit screen.
- Delete – Opens the delete confirmation popup.
UI Features
- Search bar to filter QOS entries.
- Pagination for large lists.
- Create QOS button to add new entries.
Creating a QOS Policy
This section explains how to create a new Quality of Service (QOS) policy to manage scheduling limits and job control in your Cloud HPC platform.
Navigating to QOS Creation
- Go to the QOS and Group list screen.
- Review existing QOS entries and their details.
- Click the Create QOS button (usually at the top right).
The Create QOS Screen
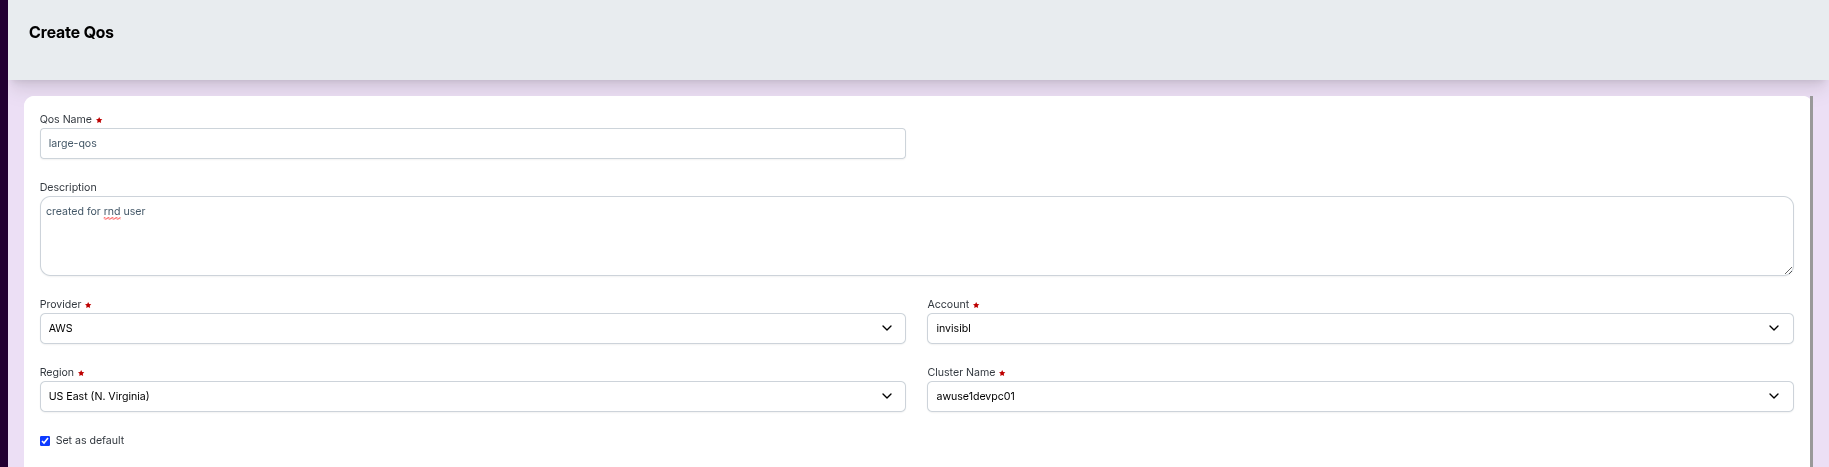
The Create QOS form appears, allowing you to enter all required fields for a new policy.
Fill in the following fields:
Qos Name
  - Enter a unique name (e.g., `default`, `urgent`).
  - This name appears in the QOS list.
Description
  - Add optional notes or the purpose of this QOS.
  - Example: “Created for testing.”
Provider
- Select the provider (usually AWS).
Account
- Choose the cloud account where this QOS applies.
Region
- Select the deployment region (e.g., US East (N. Virginia)).
Cluster Name
- Select the cluster to associate with this QOS.
Set as Default
- (Optional) Check this to make the new QOS the default policy.
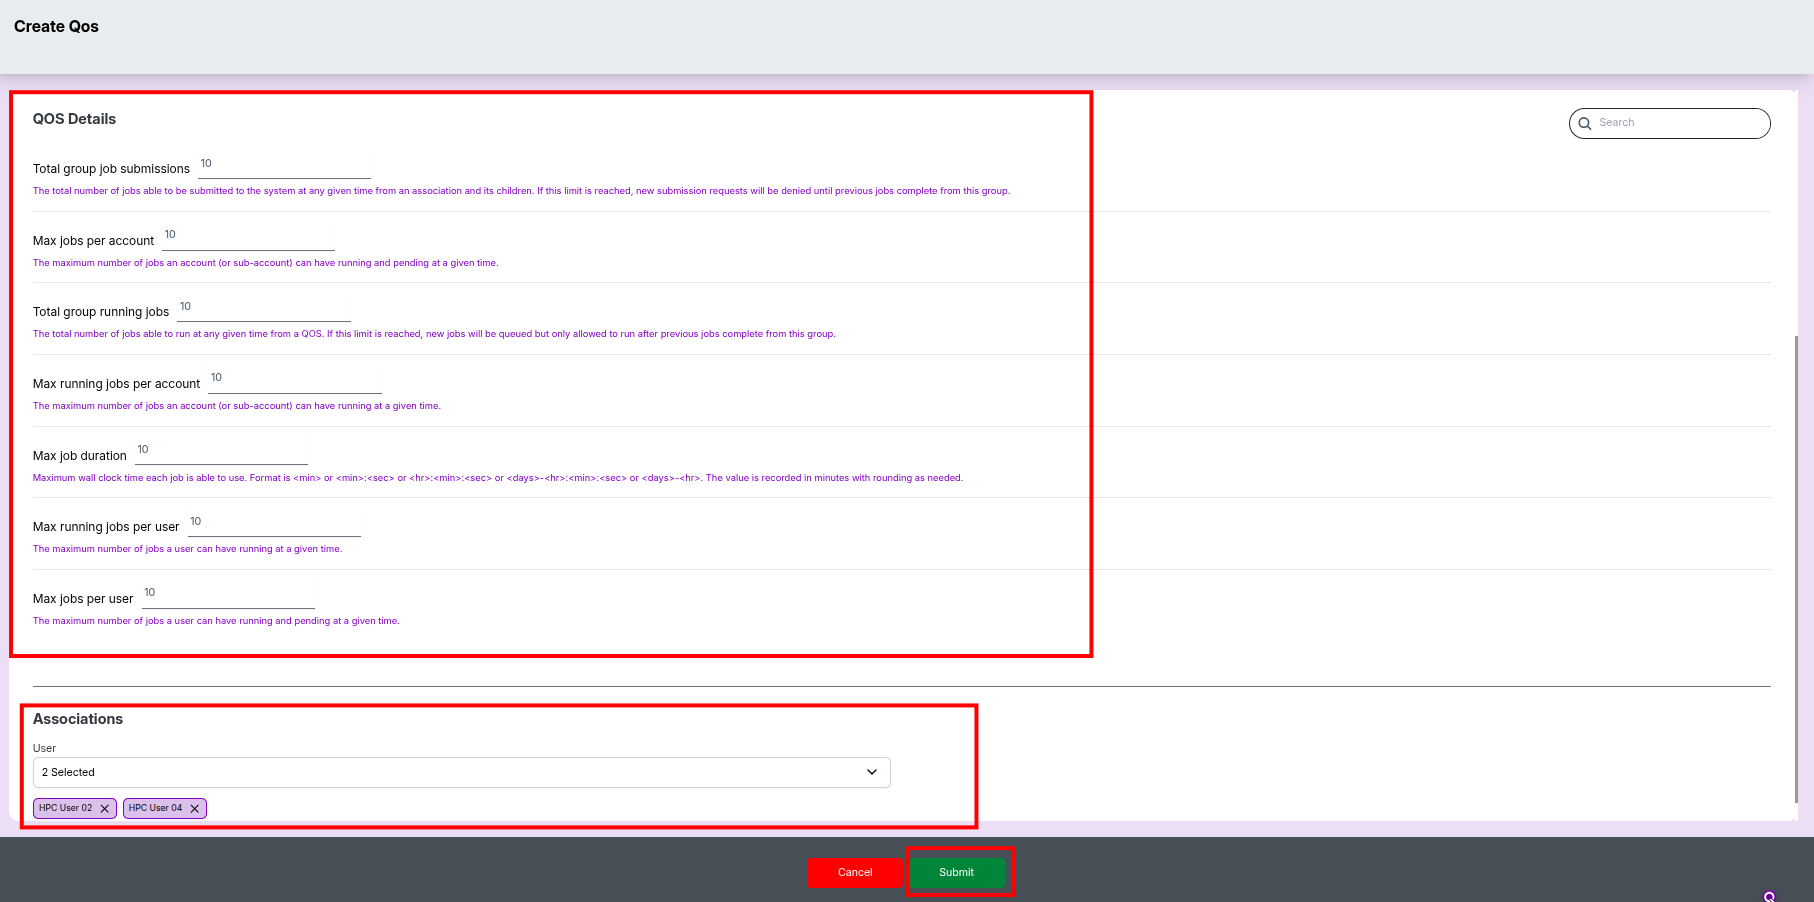
QOS Details
Set limits and scheduling parameters for job execution:
-
Total group job submissions
Max number of jobs the group can submit simultaneously. -
Max jobs per account
Total jobs (running + pending) allowed for that account. -
Total group running jobs
Maximum running jobs across all users in the group. -
Max running jobs per account
Restricts how many jobs can run in parallel per account. -
Max job duration
Allowed wall-time in formats like:
<mins>,<hrs>:<mins>:<secs>,<days>-<hrs>. -
Max running jobs per user
Maximum number of concurrent running jobs per user. -
Max jobs per user
Absolute limit for jobs (any state) per user.
Associations
User Selection
    - Choose one or more users or groups affected by this QOS.
    - Use the dropdown to add users (e.g., *HPC User 01*, *HPC User 02*).
Finalizing QOS Creation
- Review all details for correctness.
- Click Submit (green button) to save the new QOS.
- Or click Cancel (red button) to discard and return to the list.
After Creation
- The new QOS entry appears immediately in the QOS and Group list.
- You may edit or delete it anytime using the list actions.
-
📘 Best Practice
- Always review QOS limits with your HPC admin team to avoid job scheduling disruptions.
- New QOS settings apply immediately to future submissions but do not affect running jobs.
Edit / Modify QOS Screen
Editing a QOS Policy
To modify an existing Quality of Service (QOS) policy, follow the steps below.
Steps to Edit a QOS Policy
- Open the QOS and Group list screen.
- Click the Edit button next to the QOS entry you want to modify.
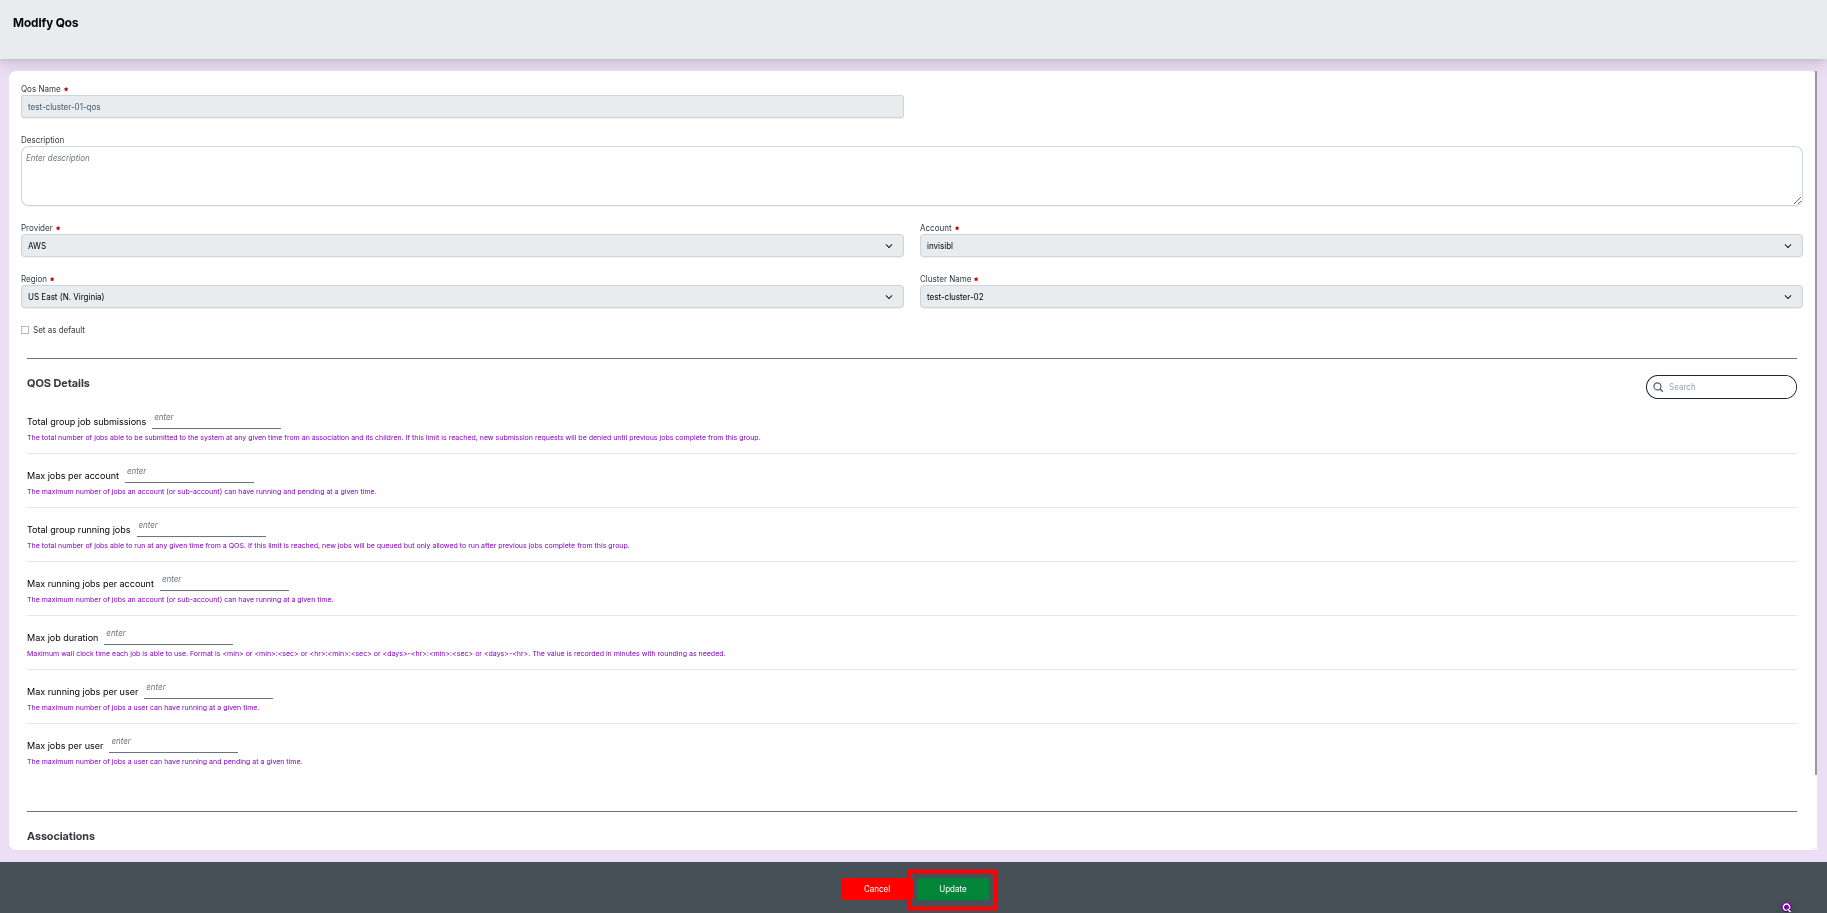
- The Edit QOS form will appear, pre-filled with existing values.
What You Can Update
You may modify any of the following fields:
- QOS Name
- Description
- Job limits (running jobs, max duration, account limits, etc.)
- Associations (users or groups linked to the QOS)
- Any other configurable attributes shown in the form.
Saving or Discarding Changes
- Click Update to save all modifications.
- Click Cancel to exit without applying changes.
After Editing
- Updated values take effect immediately for all new job submissions governed by this QOS.
- Running jobs are not affected by QOS changes.
-
📘 Best Practice
- Review QOS changes with administrators before applying them to avoid scheduling conflicts.
- Always verify user/group associations after updates to ensure correct policy enforcement.
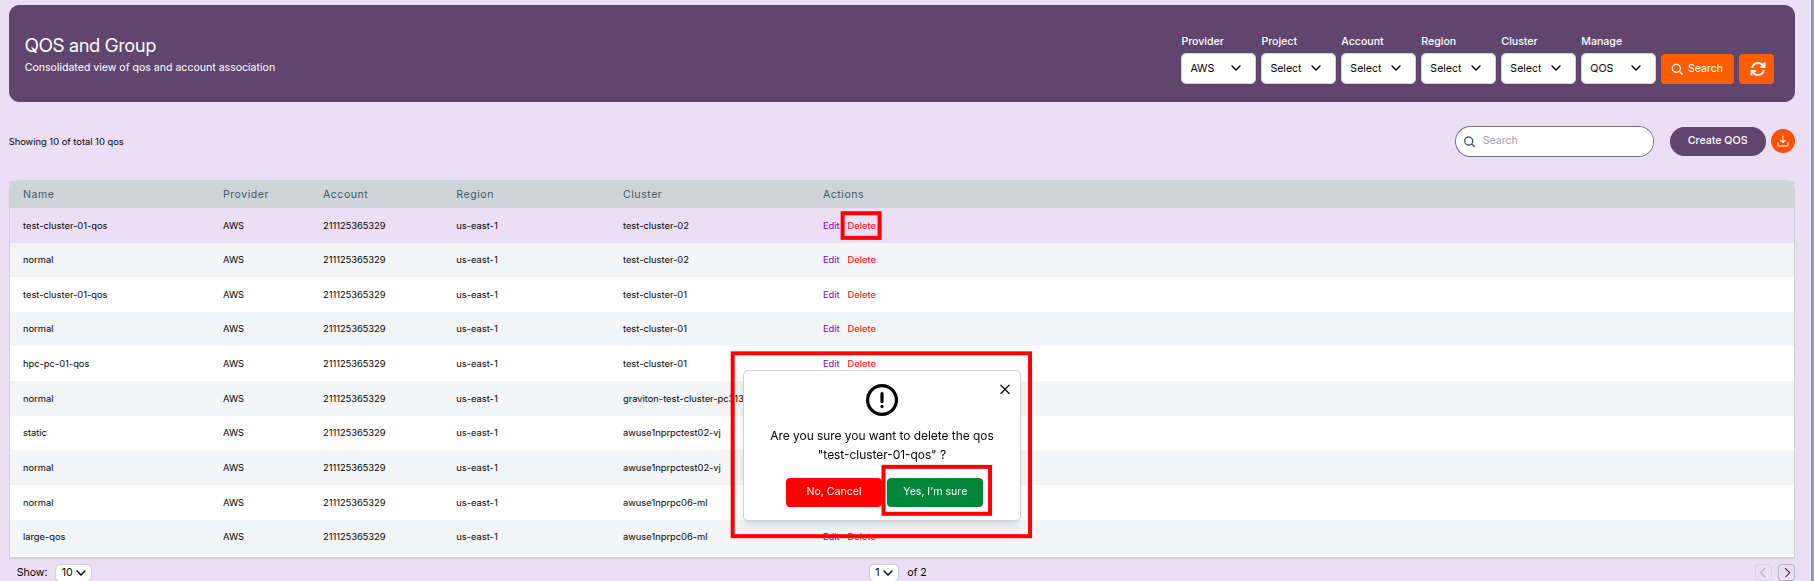
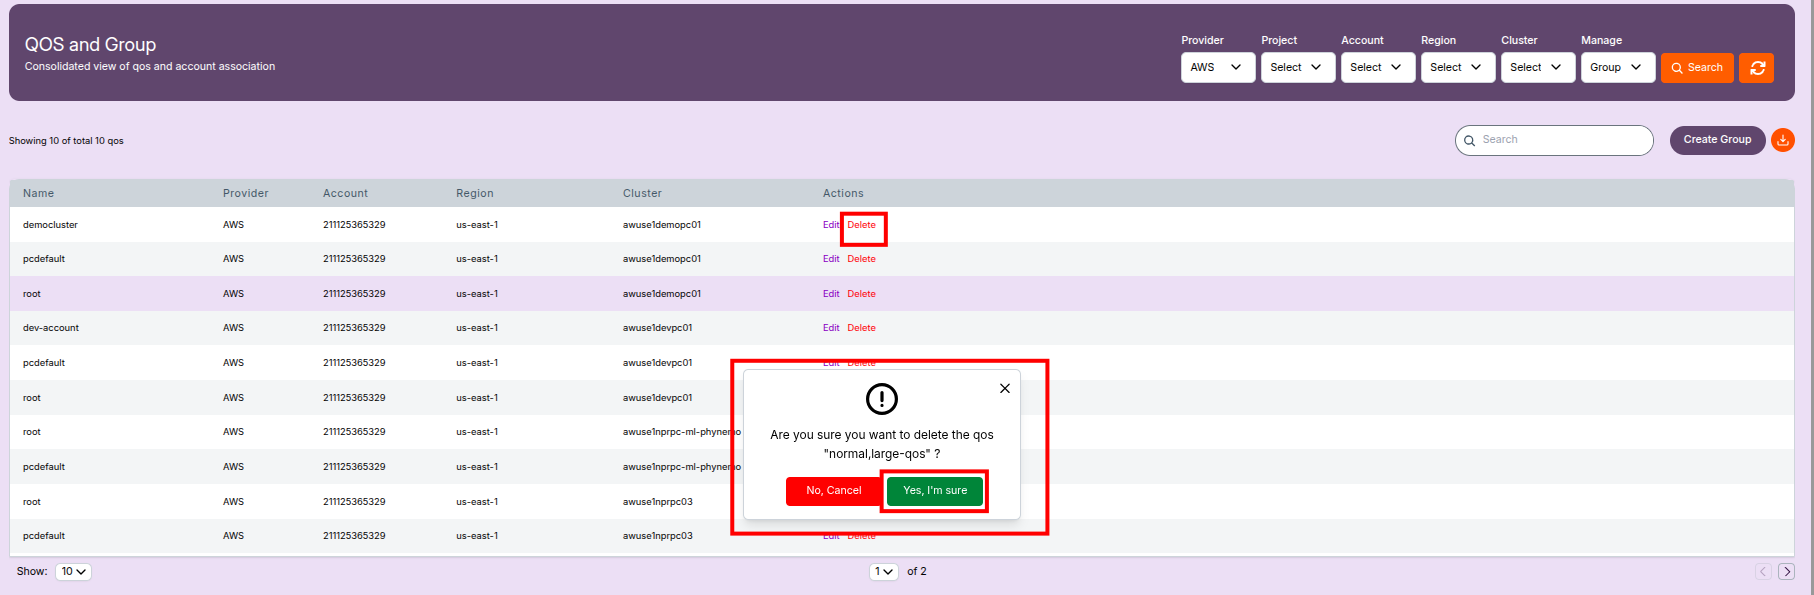
Delete QOS Confirmation
Popup message appears when clicking Delete.
Message:
“Are you sure you want to delete the qos [qos-name]?”
Options
- No, Cancel – Close popup.
- Yes, I'm sure – Permanently delete QOS.
Additional Notes
-
📘 Best Practice
- Review QOS limits with the admin team before applying changes to avoid job scheduling failures.
- Editing a QOS does not affect running jobs but immediately impacts future submissions.
- Use provider/region/cluster filters to quickly locate specific QOS entries.
Managing Groups Under QOS
This page describes how to search, create, edit, and delete groups associated with QOS policies in your Cloud HPC platform.
Finding and Listing Groups
To view existing groups:
- Select Group from the Manage filter at the top of the QOS and Group screen.
- Apply additional filters such as:
- Provider
- Account
- Region
- Cluster
- Click Search.
The results table shows:
- Name – Identifier of the group
- Provider / Account / Region – Cloud context
- Cluster – Cluster where the group is linked
- Actions – Edit / Delete options
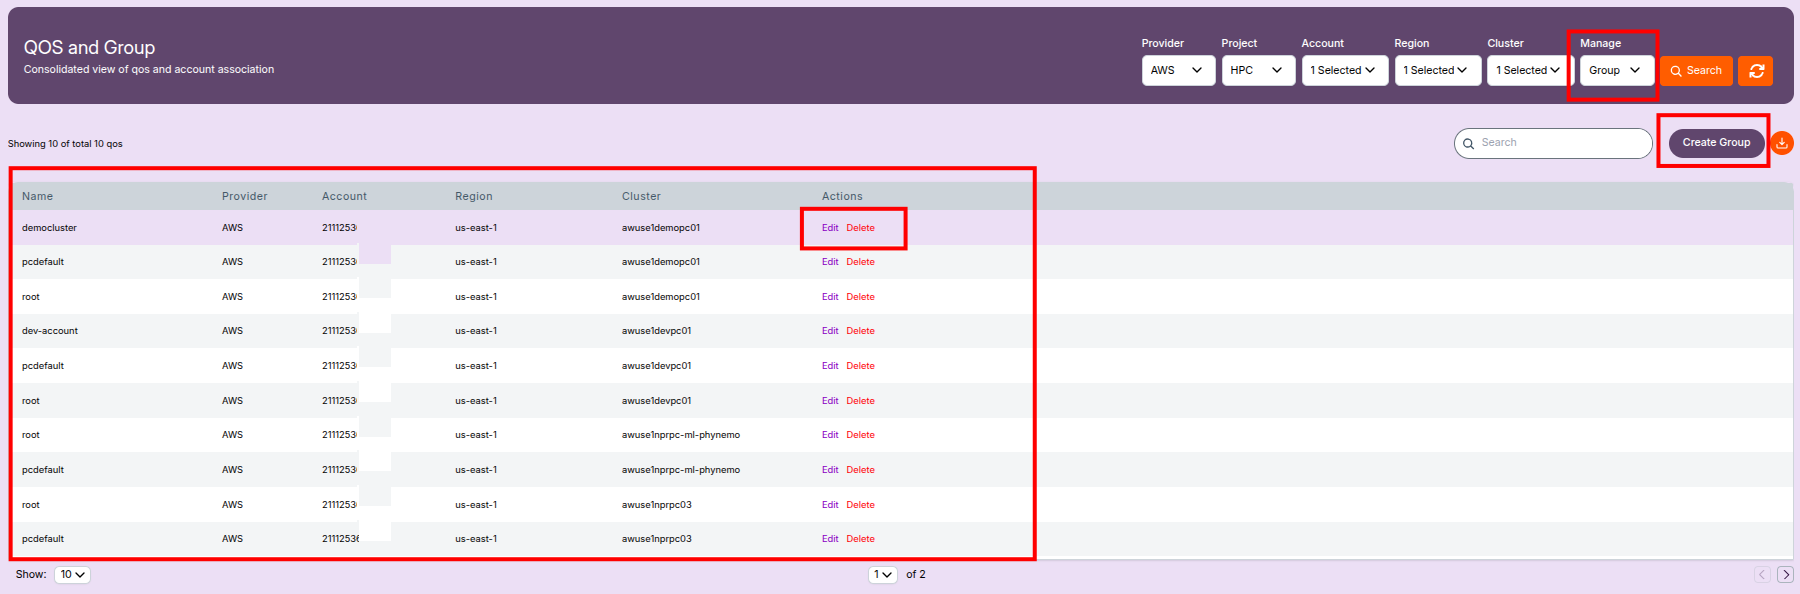
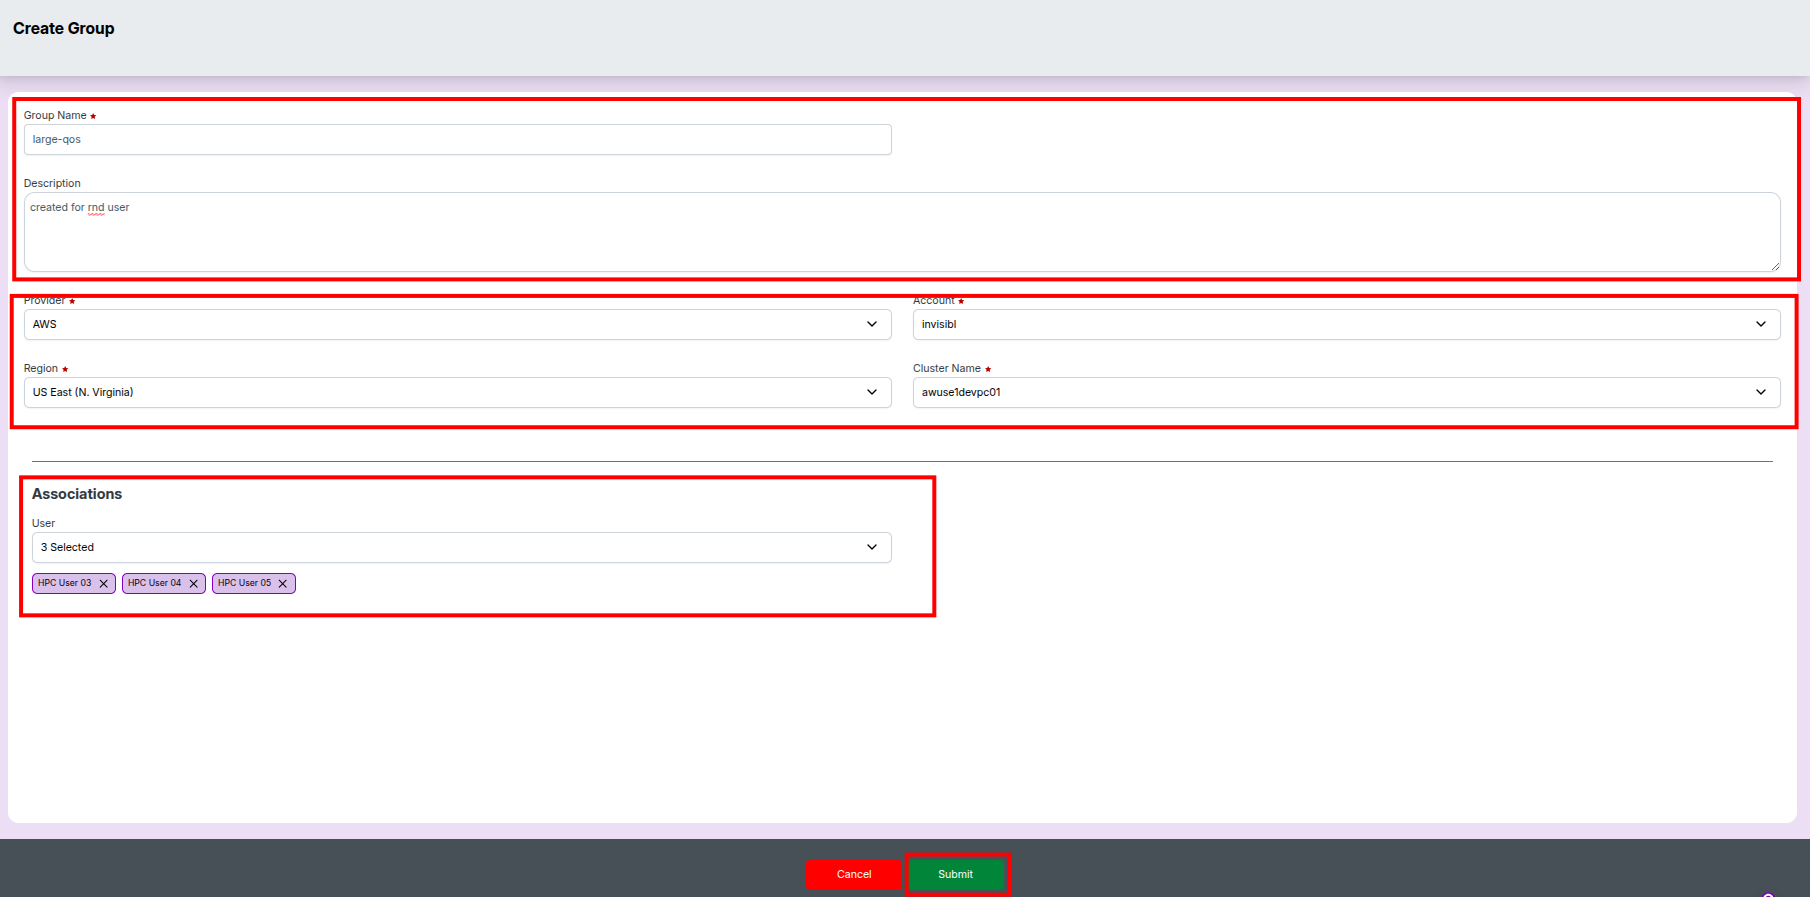
Creating a New Group
- Click Create Group on the Group list page.
-
Fill in the following fields:
-
Group Name – Unique name (e.g.,
rnd-user) - Description – Purpose or notes
- Provider – Cloud provider (e.g., AWS)
- Account – Target cloud account
- Region – Deployment region
- Cluster Name – Cluster associated with this group
- User Associations – Select users to add
Click Submit (green button) to complete creation.
The group appears immediately in the list.
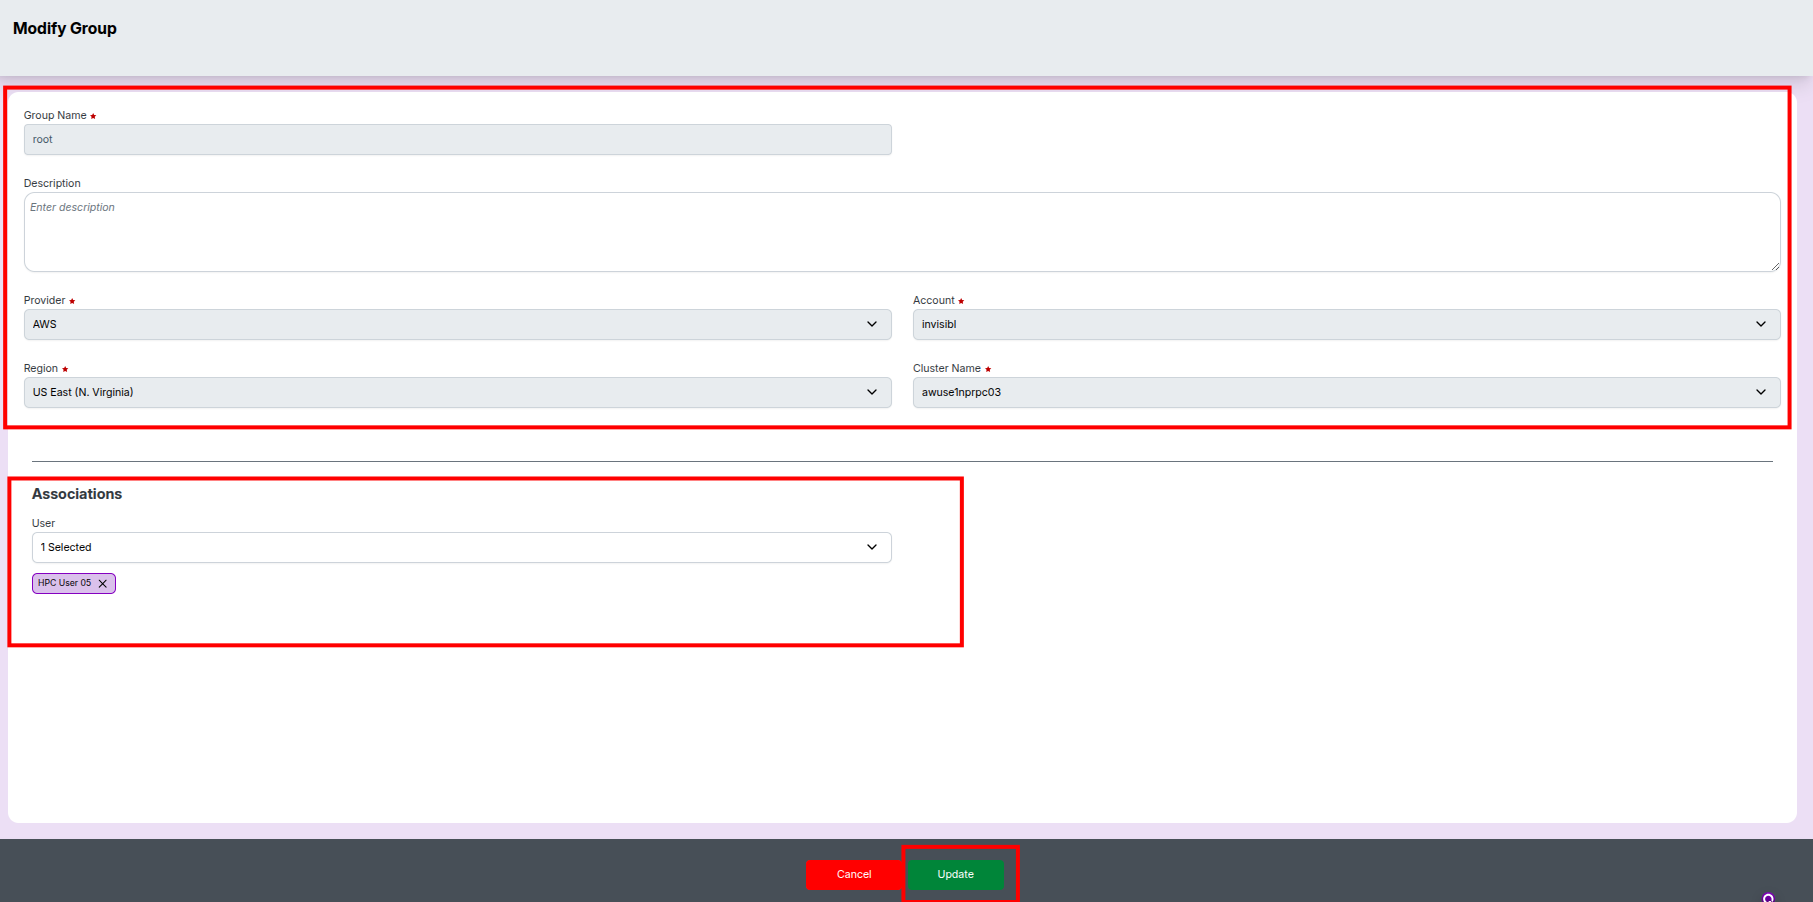
Editing an Existing Group
- Click Edit for any group in the list.
- Modify any fields:
- Group name
- Description
- Provider, account, region
- Cluster name
- User associations
Click Update to save changes or Cancel to discard.
Deleting a Group
- Click Delete beside a group.
- A confirmation popup appears.
Select Yes, Confirm to permanently delete, or Cancel to exit.
Deleted groups cannot be recovered.
Key Points
-
📘 Key Points
- Groups simplify assigning QOS policies across multiple users.
- Use descriptive names to improve long-term manageability.
- Review user associations carefully before making edits.
- Deleted groups cannot be restored—confirm before removal.
Additional Notes
-
📘 Best Practice
- Audit group memberships periodically to ensure correct access control.
- Before deleting a group, verify no workflows or QOS rules depend on it.