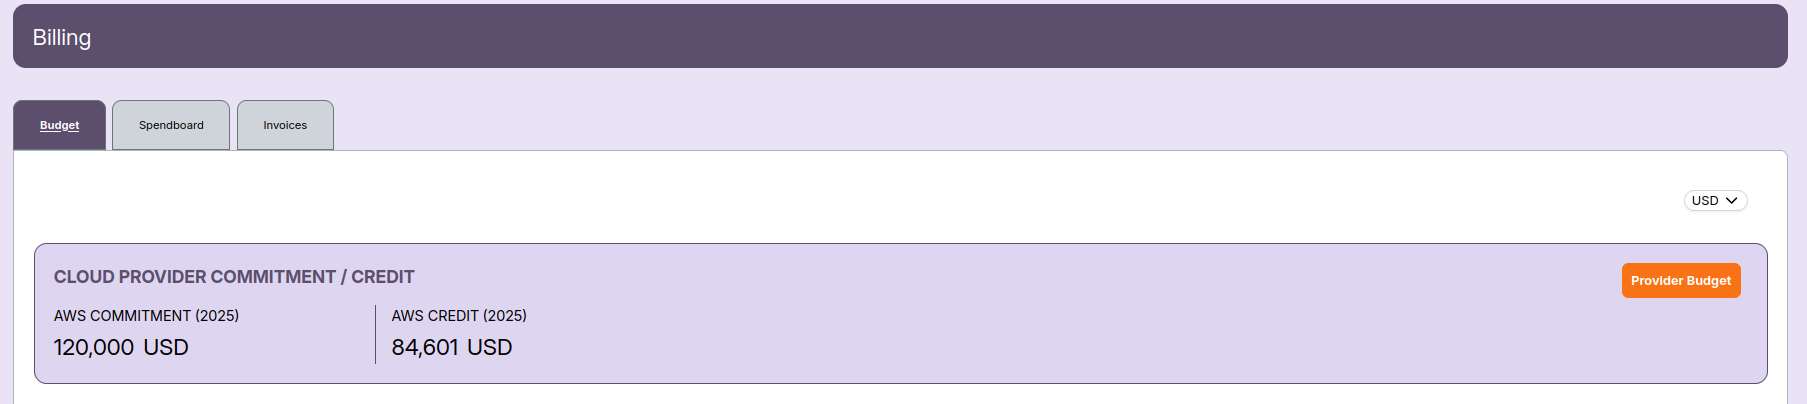
Budget
- The Budget tab provides details of all defined cloud budgets.
- The top section shows CLOUD PROVIDER COMMITMENT / CREDIT, summarizing the following information:
- AWS Commitment (2025): Total committed amount for AWS for the selected year.
- AWS Credit (2025): Total available AWS credits for that year.
- To update provider commitments or credits, click the Provider Budget button.
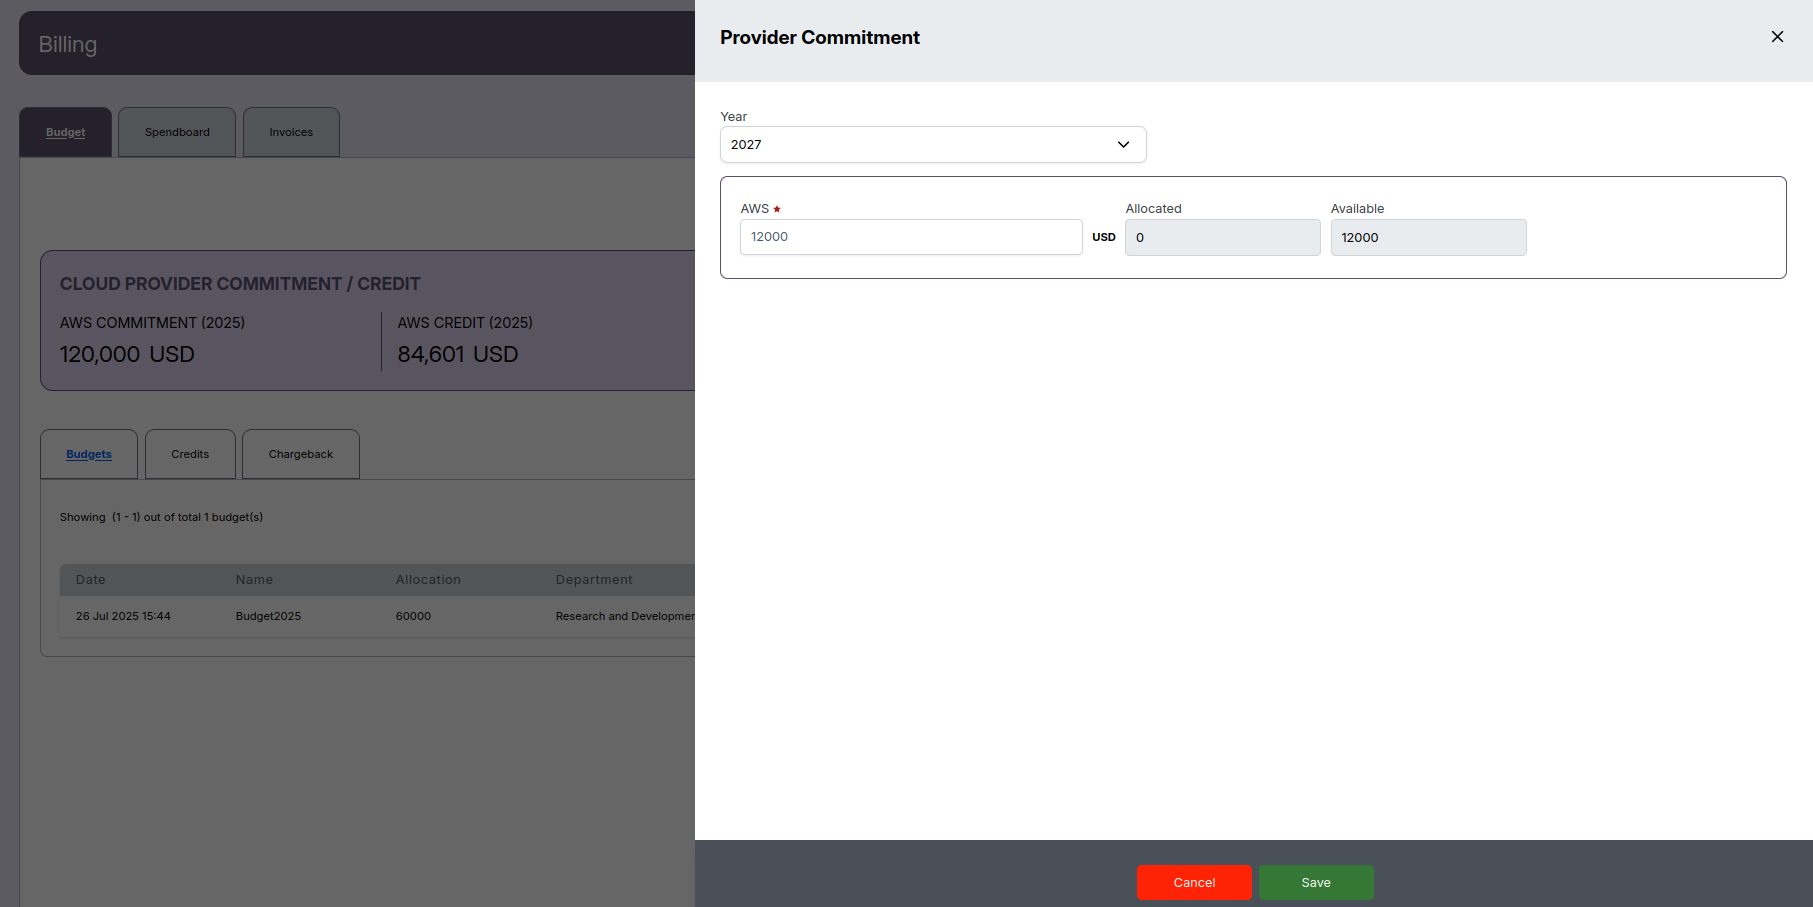
Creating Provider Commitment / Credit
When you click the Provider Budget button, the Provider Commitment window opens. This screen is used to define or update yearly cloud provider commitments and available credits.
Fields in Provider Commitment
- Year: Select the year for which the commitment or credit is being defined.
- AWS: Enter the committed amount for AWS (required field).
- Allocated: Displays the portion of the commitment that is already used.
- Available: Shows the remaining available amount, auto-calculated based on the allocated value.
Actions
- Save: Saves the commitment or credit details.
- Cancel: Closes the window without saving any changes.
Example
- Suppose you select Year: 2027 and enter AWS: 10,000 USD.
- The Available field will automatically show
10,000 USDif no funds are allocated yet. - After saving, the updated commitment will appear in the main Billing screen under CLOUD PROVIDER COMMITMENT / CREDIT.
-
📌 Note
- All values are shown in **USD** by default. You can change the currency from the dropdown on the top-right of the Billing page.
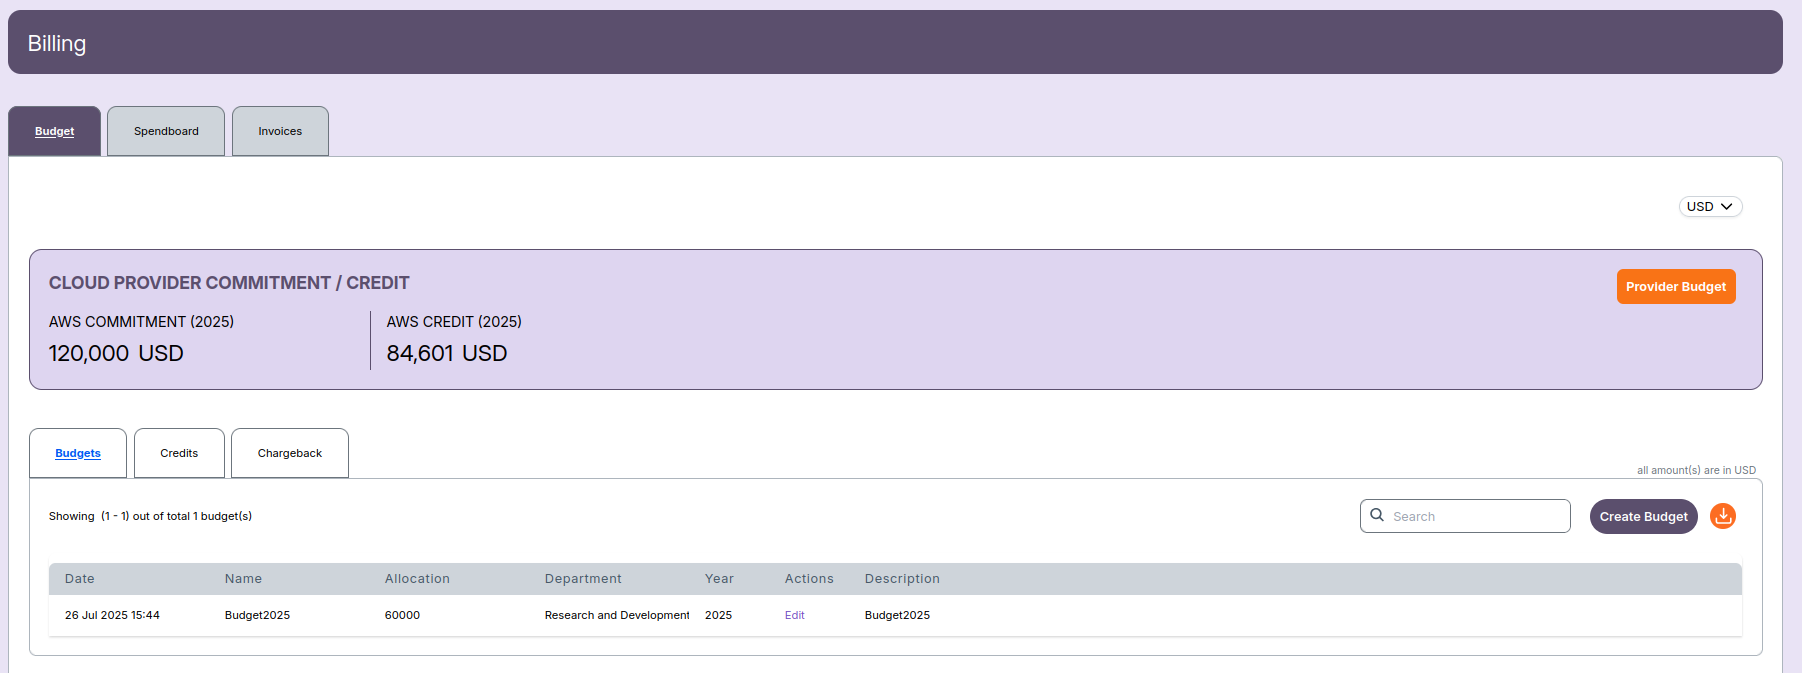
Budgets List
Below the summary, a list of existing budgets is displayed with details such as:
- Date: The date and time when the budget was created.
- Name: The assigned budget name.
- Allocation: The amount allocated (in USD).
- Department: The department that owns the budget.
- Year: The corresponding fiscal or calendar year.
- Actions: Option to edit existing budgets.
- Description: A short note describing the purpose of the budget.
Additional options:
- Use the Search bar to filter budgets quickly.
- Click Create Budget to add a new budget entry.
- Use the Download icon to export the budget list.
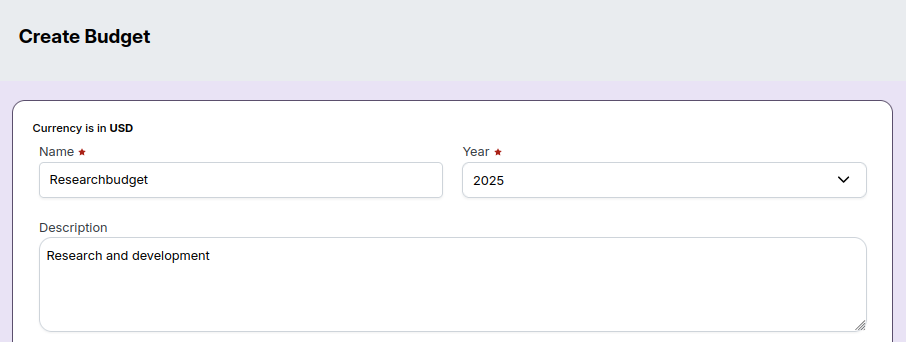
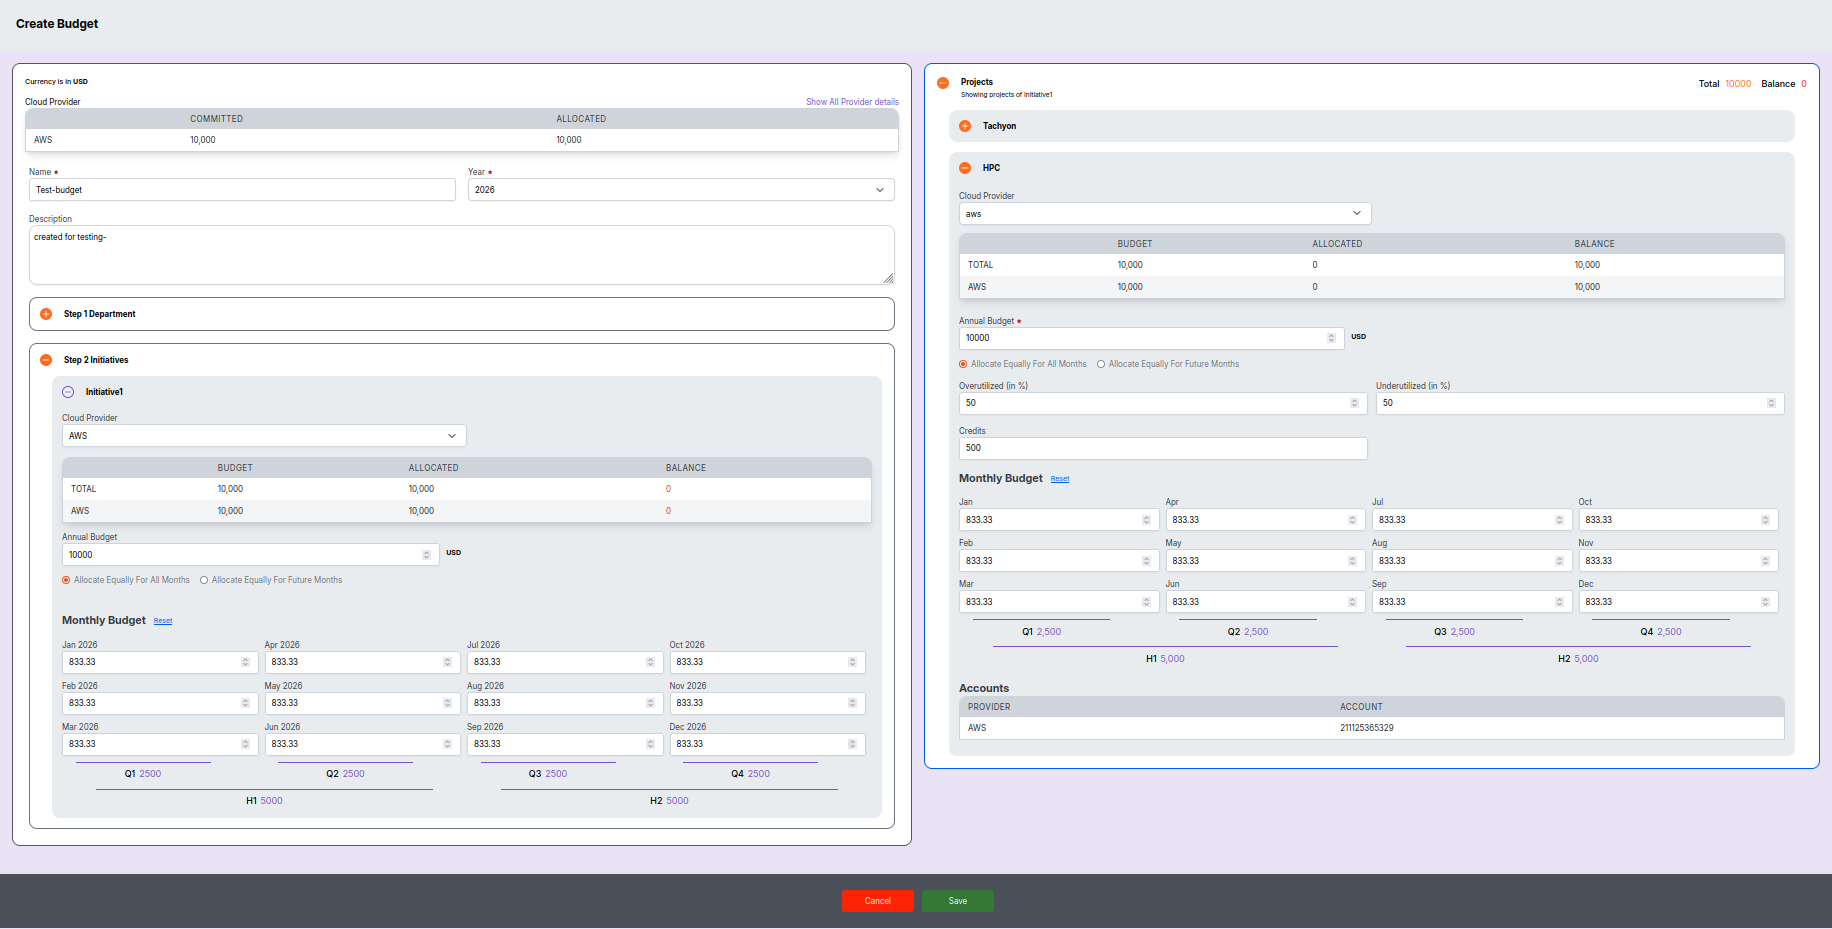
Create Budget
This guide explains how to create a new cloud provider budget in the portal. The process applies to creating budgets for AWS in a structured way, assigning budgets to departments, and setting monthly, quarterly, and half-yearly distribution.

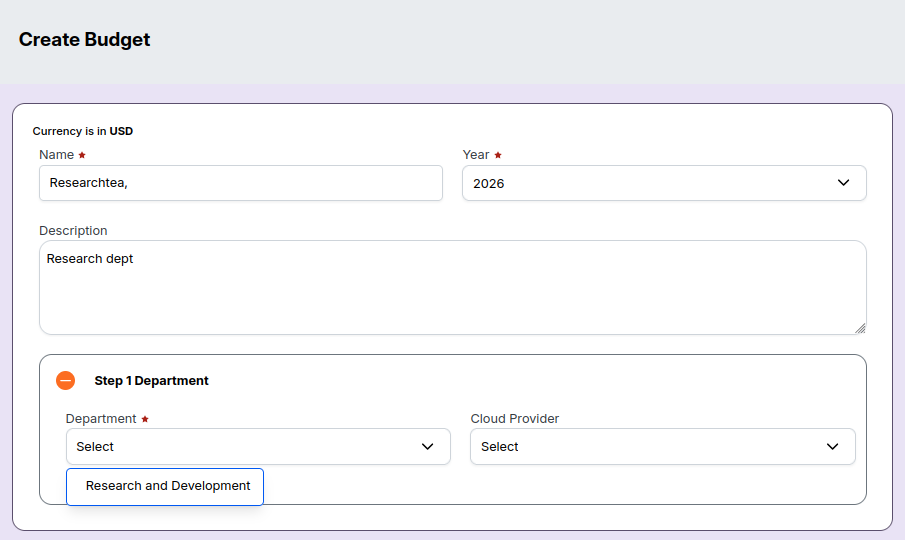
Step 1: Start a New Budget
-
Access the Budget Creation Page
- Navigate to the "Create Budget" page from the budget dashboard.
- The currency for the budget is displayed (here, USD).
- The top section summarizes provider commitments and allocations.
-
Fill in Basic Budget Details
- Name: Enter a name for your budget (e.g.,
Test-budget). - Year: Select the financial/planning year (e.g.,
2026). - Description: Optionally, add a description for context, such as the purpose or scope of the budget.
- Name: Enter a name for your budget (e.g.,
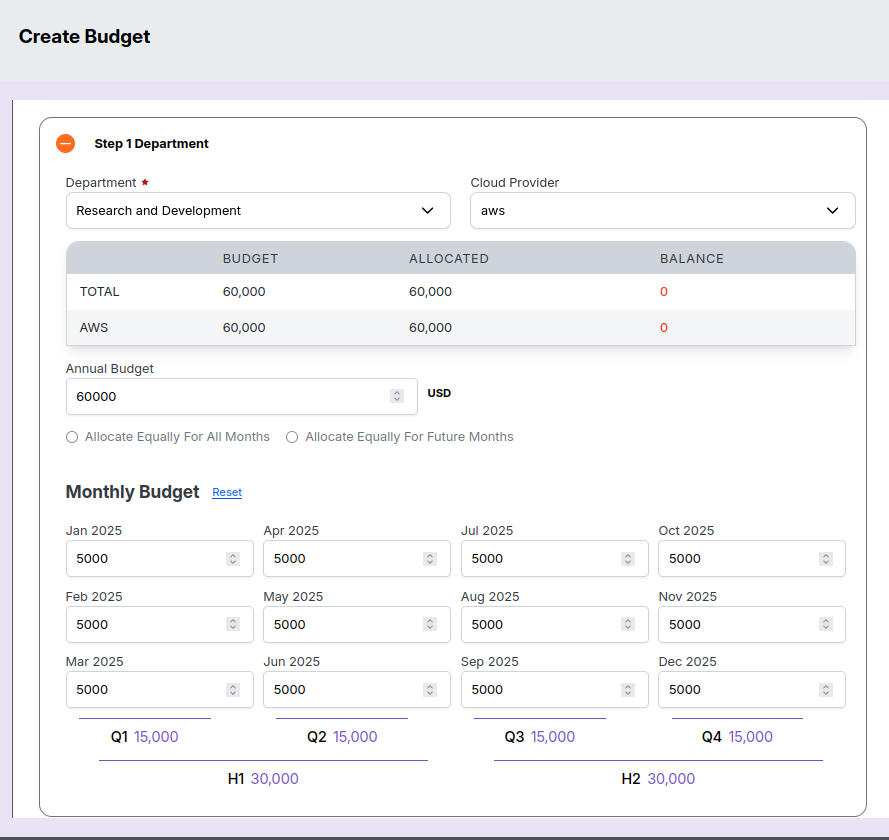
Step 2: Department Allocation
-
Select the Department
- Expand Step 1 Department.
- Use the dropdown to select the target department (e.g.,
Research and Development). - Select the relevant cloud provider (e.g.,
AWS).
-
View and Confirm Allocations
- Budget, allocated, and balance columns are auto-filled based on previous entries.
- Confirm that the totals match your planned distribution.
Step 3: Set the Annual and Monthly Budget
-
Set the Annual Budget
- Enter the total annual budget for the cloud provider (e.g.,
10,000USD). - Decide on distribution:
- Allocate Equally For All Months: Distributes the annual total equally over each month.
- Allocate Equally For Future Months: If selected, divides the remaining budget equally among future months.
- Enter the total annual budget for the cloud provider (e.g.,
-
Edit Monthly Budget as Needed
- Modify each month’s value if distribution is not equal or needs adjustment.
- The interface will provide a grid for each month (Jan – Dec), pre-filled with equal amounts if selected.
- Quarterly (Q1, Q2, etc.) and half-year (H1, H2) calculations are auto-generated for reference.
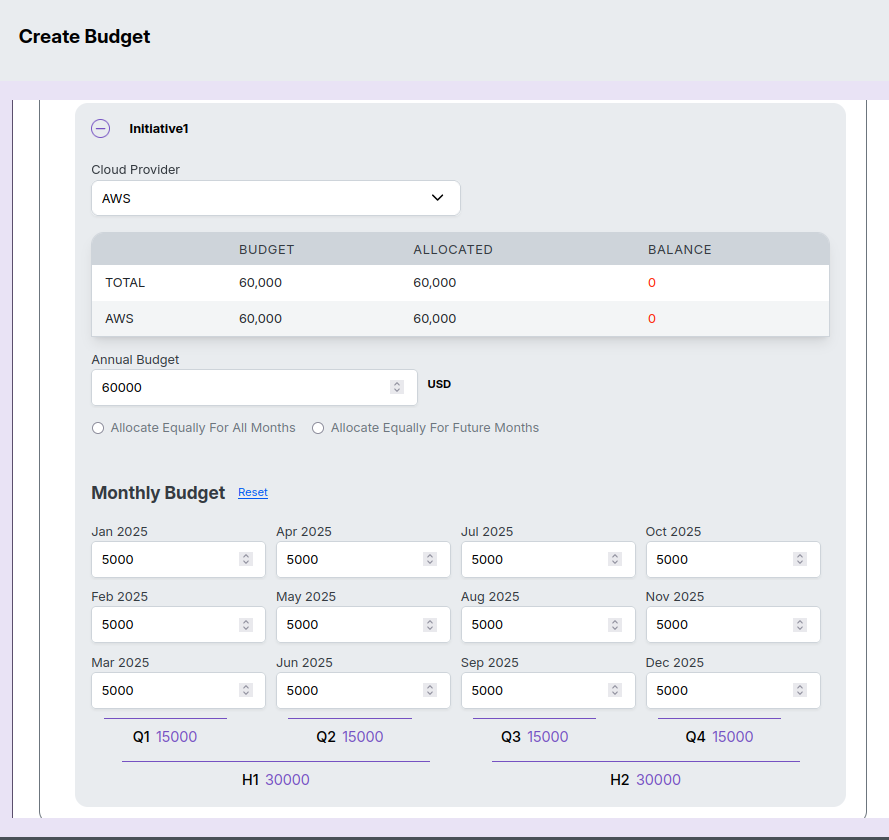
Step 4: Initiatives (Optional/As Needed)
- Assign Initiatives
- Expand Step 2 Initiatives.
- Define or select an Initiative (e.g.,
Initiative1) and assign its cloud provider. - Set initiative-specific budgets and allocations under the selected project.
- Ensure initiative allocations are consistent and do not exceed the department’s overall budget.
Tip: You may skip this step if not using initiatives.
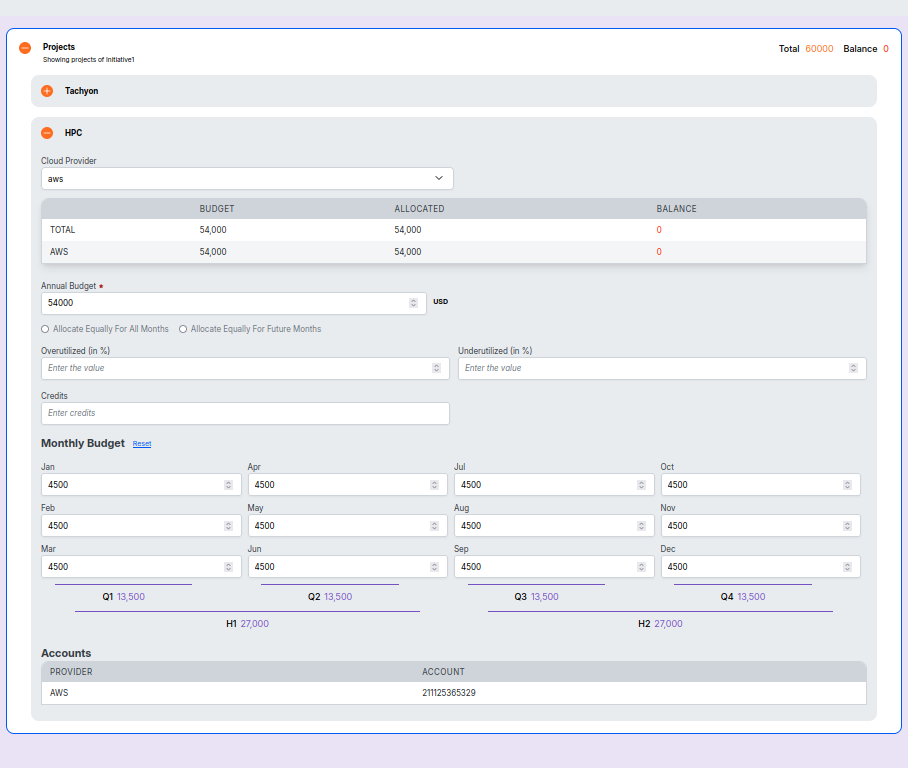
Step 5: Project and Credit Settings
- View Projects & Account Details (Right Section)
- The right panel displays a breakdown of projects (e.g.,
Tachyon,HPC). - For each project, configure:
- Cloud provider.
- Budget, allocation, and balance grid.
- Annual budget for the project.
- Overutilization and underutilization percentage settings.
- Credits, if applicable.
- Monthly, quarterly, and half-year budget distribution per project.
- Account information is shown at the bottom (e.g., account number for AWS).
- The right panel displays a breakdown of projects (e.g.,
Interface Example:
Step 6: Save or Cancel
- After entering all details and verifying the allocations, click Save (green button) to create the budget.
- Click Cancel (red button) to discard changes and exit the budget creation workflow.
-
📌 Note
- - Ensure all required fields (marked with *) are filled out before saving. - Double-check all monthly and annual totals to avoid over-allocation. - The interface provides comprehensive totals and balances for easy verification.
Edit Budget
This guide describes how to edit an existing cloud provider budget from the budget list. You can update values as needed and save the changes, which will reflect in the budget list.
Step 1: Access the Budget List
- Navigate to the Billing section.
- Ensure the Budget tab is active to view available budgets.
- The page displays:
- Cloud provider commitment/credit summary at the top.
- A table listing all budgets with columns for date, name, allocation, department, year, actions, and description.
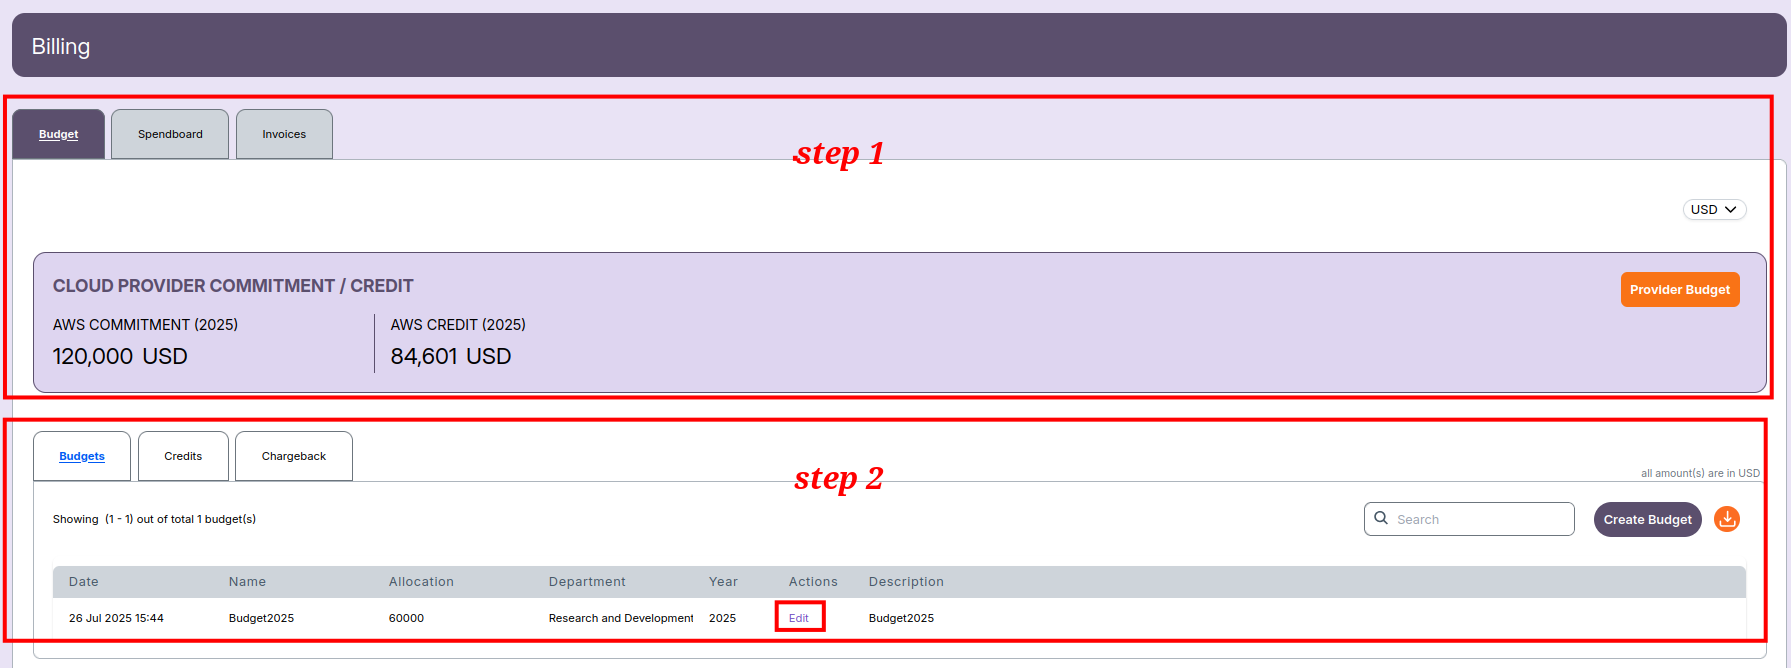
Step 2: Open the Edit Budget Screen
- In the budget list table, locate the budget you want to modify.
- Click the Edit link in the Actions column for the desired budget.
- The Edit Budget screen will appear, allowing changes to all budget details, similar to the create flow.
Step 3: Modify Budget Values
- On the Edit Budget screen:
- Committed and allocated summaries are displayed at the top.
- Edit the Name, Year, and Description fields if required.
- In Step 1 Department, update the department, cloud provider, and allocation fields as needed.
- Adjust the Annual Budget and monthly allocation.
- Change initiative/project-specific details in the right panel if your workflow requires.
- All other controls and validation are the same as during budget creation.
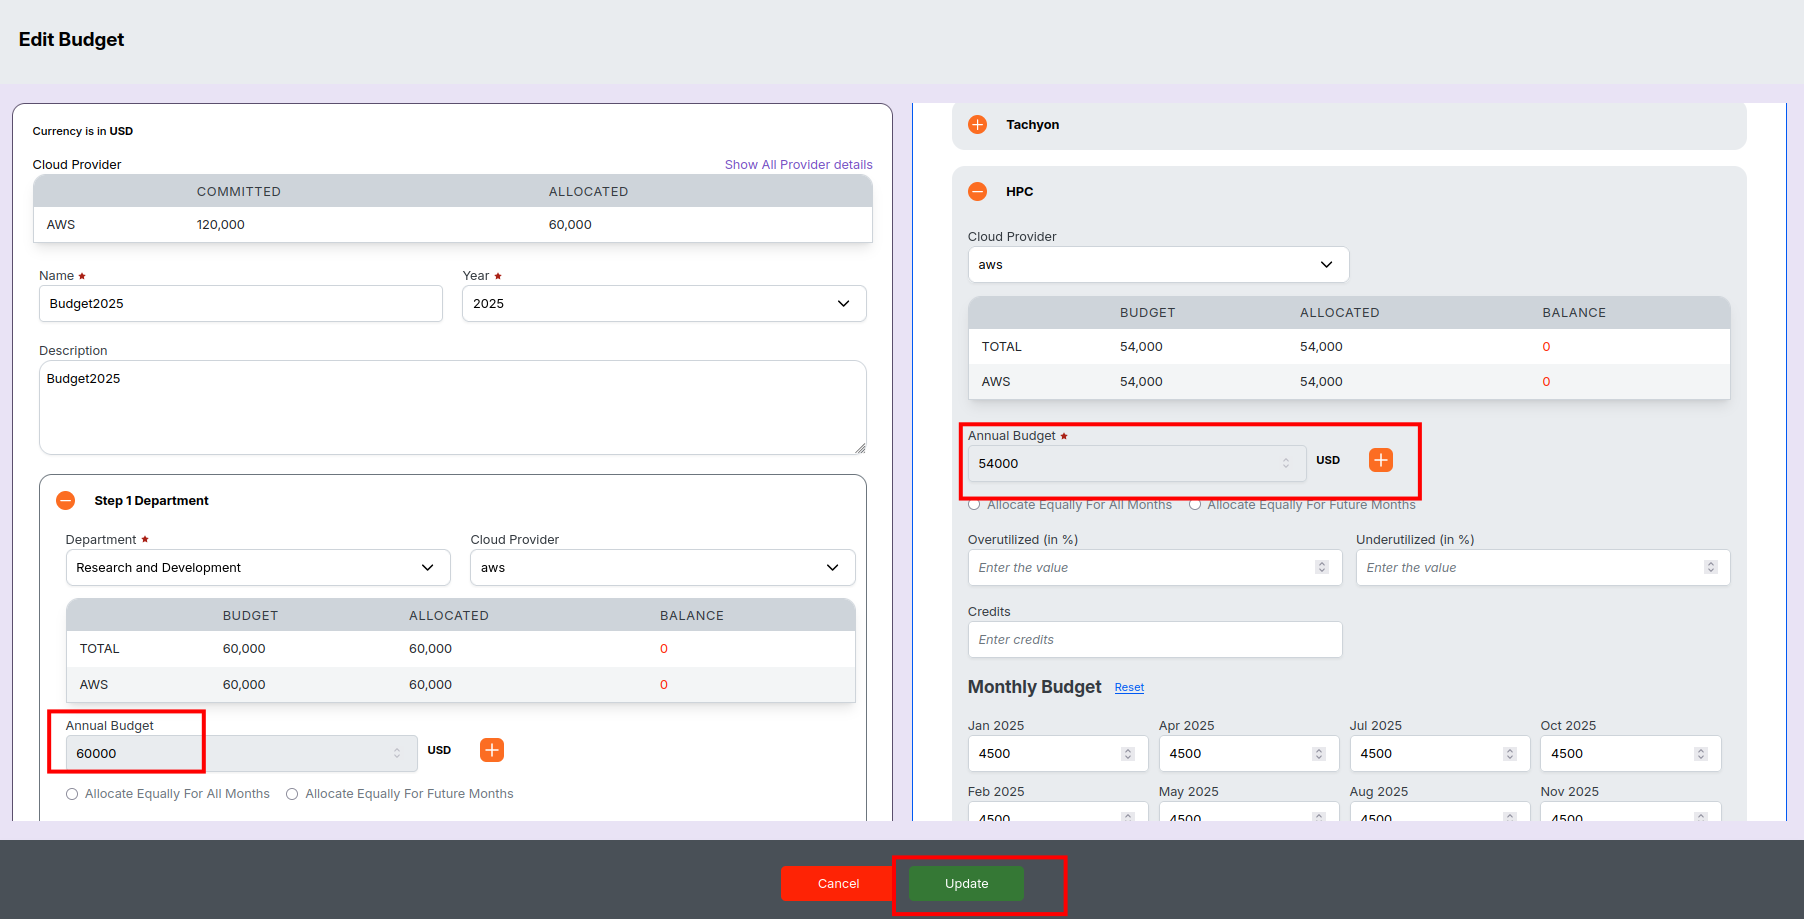
Step 4: Update and Save Changes
- After editing, review the details to verify accuracy.
- Click the Update button (green) to save changes.
- Use Cancel if you want to exit without saving edits.
Step 5: Review the Updated Budget
- After saving, you are returned to the budget list screen.
- The list now displays your updated budget details.
-
📌 Note
- The edit flow is similar to the create flow, but here you only change necessary fields. All validations and required fields remain enforced during edits.